

When developers made their first attempts at running Python and JavaScript on microcontrollers a few years ago, the augurs laughed. The computing power available at the time was too low, and performance too poor – the old saying that a garbage collector is not conducive to real-time capability now applies universally. Running PHP directly on the microcontroller is not possible at this time. However, if you want to interact with hardware via PHP web pages, this is certainly possible. In this article, I present the simpler variant and go into limits, possibilities, and expansion stages.
A look into the Pleistocene
The introduction of the Arduino Yun was a technical quantum leap in many respects – particularly relevant to this was the concept of the combinatorial process computer shown in Figure 1.
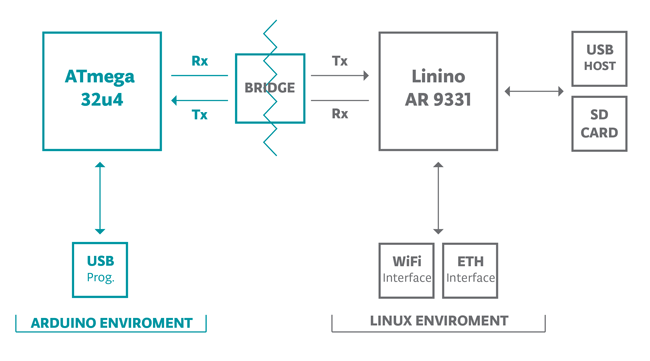
While WLAN communication, HTTP protocol processing, and the like were processed on a high-performance microcontroller running under Linux, the user also had the Atmel eight-bit processor known from classic Arduino Uno at his disposal, on which real-time-critical or otherwise difficult hardware interaction tasks could be implemented. The two processors could exchange information with each other via a library known as a bridge, which adequately describes the concept of the combinatorial process computer. With direct, over a USB cable between PHP server and process computer taking place communication, we find in principle the same Design paradigm. The only difference is that instead of the bridge library, the PHP serial module, which is available in a large number of forks, is used. This allows the PHP application to access the serial interface of the workstation, via which the PHP code can send more or less arbitrary commands to the connected process computer. On it, there is a self-developed or readily obtained firmware, which evaluates the serial port and forwards the incoming change commands in the direction of any connected hardware. It follows from logic that this approach creates a high latency between sending and receiving the command. If you need to react quickly to events, you would be well advised to place the necessary code directly on the Arduino – for visualizations or the tasks that occur in the smart home area and are usually not very latency-critical, however, the system is almost ideally suited.
Setting up the working environment
The developer behind PHP-Serial points out several times on GitHub that the library works best on Linux – macOS may also be conceivable to some extent, while a Windows working environment generally comes with problems. It should be mentioned, however, that there is now a whole group of forks that are optimized for such usage scenarios. At this point, it should be noted that the most reasonable way to use PHP-Serial is local deployment. In the following steps, the author will work with his workstation running under Ubuntu 18.04 LTS. First, open a terminal window and command a LAMP stack to be deployed by typing the following command:
tamhan@TAMHAN18:~$ sudo apt-get install lamp-server^
Since our program here must interact directly with hardware, the P.T. PHP programmer is not exempt from administering the server. Of particular importance is that the user responsible for running the PHP server is allowed to access the serial ports of the machine. The easiest way to do this is to add your user account to the dialout group. dialout is a kind of universal permission filter that allows access to serial peripherals under Linux. For this we have to return to the terminal window anyway and target the entry with the following command:
tamhan@TAMHAN18:~$ sudo usermod -a -G dialout www-data
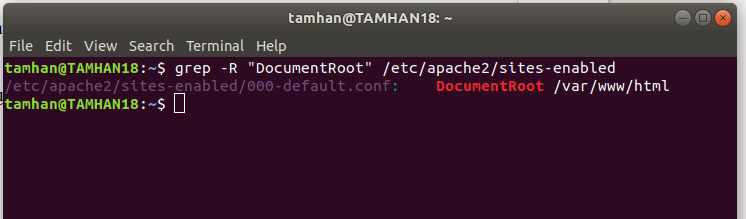
Next, we need to determine where exactly in the file system the stack has nested – namely, the PHP library should go to the root directory of the server. For this purpose, the following command is useful, which on the author’s workstation gives the result shown in Figure 2:
grep -R "DocumentRoot" /etc/apache2/sites-enabled
Next, we need to deploy the actual source code of the library. To do this, we visit the already existing GitHub repository and click the Raw button there to animate the GitHub frontend to deploy the file without the various formatting additions. In the next step, we use sudo and a text editor of our choice to place the PHP code provided there in a local file called PhpSerial.php. It is placed in the server root directory, which presents the following file system setup on the author’s workstation after typing ls:
tamhan@TAMHAN18:/var/www$ ls

html  PhpSerial.php
Depending on the configuration of your workstation, you may have to use sudo at this point, since the /var/www directory is often only accessible to the superuser and the PHP server user. As a paranoid nature, the author still adjusts the settings of the file afterwards to make sure that the file access permission engine included in Unix does not crossfire with the interaction of the hardware:
tamhan@TAMHAN18:/var/www$ sudo chmod 777 PhpSerial.php
The next task is to check if the integration of the file went correctly. To do this, we create a worker file in the stack’s home directory and equip it with the code from Listing 1:
Listing 1
 <html>

<head><title>PHP Test</title></head>

<body>

<?php

include 'PhpSerial.php';

echo '<p>Hello World</p>'; ?>

</body>

</html>
For experienced PHP developers, starting or activating this file should not be a big challenge – as long as the message appears in the browser window, everything is fine for now. However, since problems do occur in practice, let’s take a look at the system integration.
Contacting the Arduino
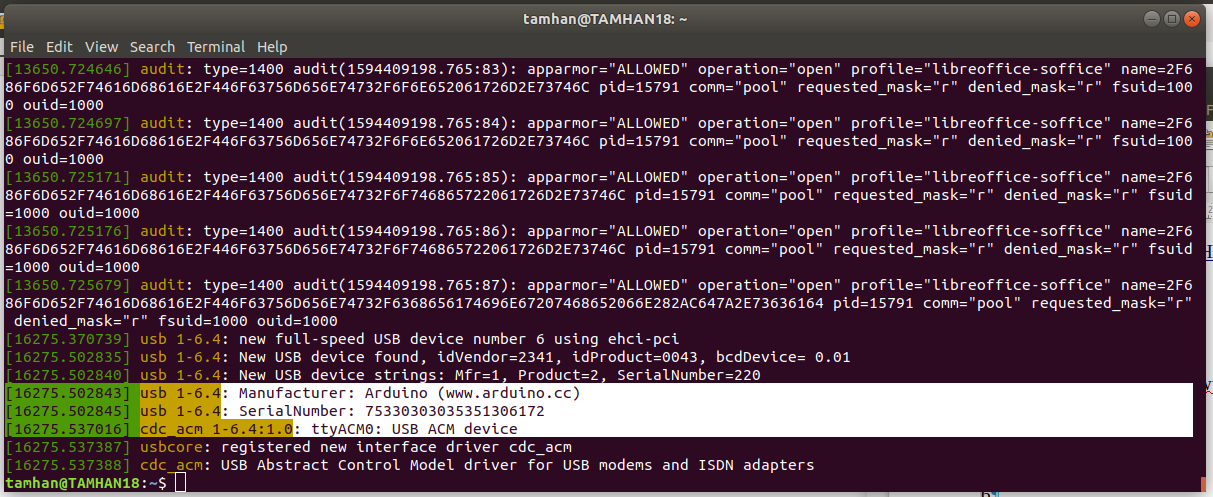
The next step is to connect the Arduino to the computer. Since we want to work here via an ordinary serial interface, you are by and large free to choose in the area of target systems – the author will, if only for reasons of nostalgia, use his good old Arduino Uno, which he once bought in Slovakia to play with. The localization is done under Linux with the dmesg command, whose output shown in Figure 3 informs that the author’s workstation has included the Arduino in the device tree.
Now, at the latest, it is highly recommended to reboot the workstation. After all, the various Linux distributions are usually more or less tricky when taking over the hardware access permission settings. In the following steps, we want to make sure that our hardware accesses do not fail due to permission errors.
Now we want to take care of providing MSR code to the Arduino responsible for the hardware communication. Since the author is working with an undemanding Arduino Uno, any reasonably recent version of the Arduino IDE will do – if you don’t have it on your computer yet, you can also get your distribution from the package sources without hesitation. Now we create a new sketch file with the following code in its set-up method:
void setup() {

Serial.begin(9600);

pinMode(13, OUTPUT);
}
In the Arduino world, it is common practice to connect the physical pin with the number 13 to a signaling light-emitting diode. Our initialization code activates the output driver on this pin and also takes care of activating the interface connected to the USB serial transmitter of the board by calling Serial.begin. The passed integer – here 9600 – is also called baudrate. The numeric value determines how fast each data bit travels across the interface – 9600 is a very conservatively chosen value that works fine even with not-so-stable connections. Arduino life content Numero two is the method Loop, which is called permanently during the actual work of the board. In it, place the structure from Listing 2 for your first try:
Listing 2
void loop() {

while (Serial.available() > 0) {

int inVal = Serial.parseInt();

if(inVal>2)

digitalWrite(13, true);

else

digitalWrite(13, false);

}

}
In the first step, the method uses the function Serial.available() to check the filling level of the UART – the following code is only executed if the serial interface has already received data from the workstation. The call to Serial.parseInt(); converts the supplied information into an integer, which is checked by the rest of the selection and finally forwarded towards the LED connected to pin 13. After the obligatory sketch saving by the checkmark symbol, a click on the arrow pointing to the right follows, which instructs the installation of the software on the board. In theory, we could already return to PHP at this point – in practice, however, we should precede with another small excursion into the world of the Arduino, which will help with troubleshooting.
Isolation of the communication protocol
One of the reasons why event-oriented software systems are particularly easy to test is that the individual modules are separated from each other by a clear interface. If problems arise during the execution of a program part, it can be isolated and bombarded with dedicated test data until the problem is circled and smoked out. When working in the embedded space, systems offer arbitrary waveform generators, but are comparatively complicated to configure. When communicating with UARTs, the Arduino IDE offers a similar tool that emulates the serial terminal familiar from classic server administration. Click on the Tools | Serial Monitor option in the menu to activate the window shown in Figure 4.
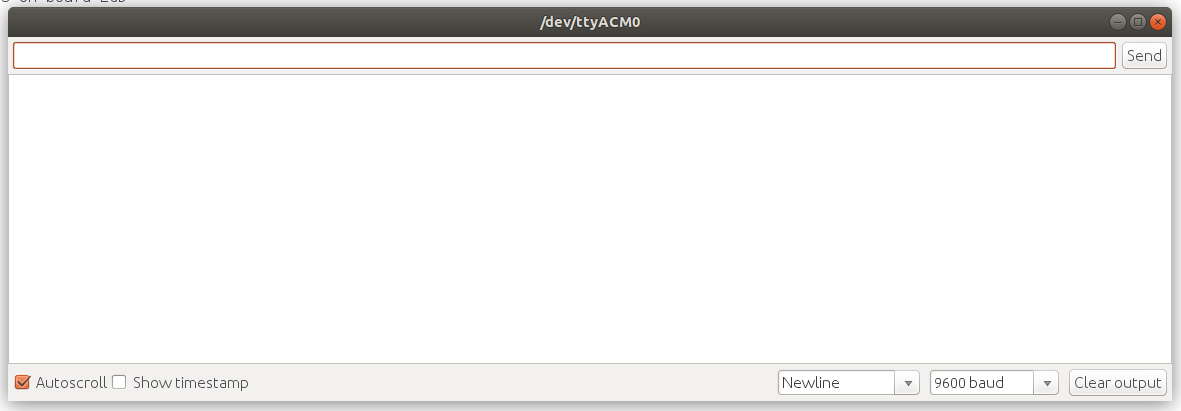
In the text box displayed at the very top, you can place more or less any information that will be automatically transmitted towards the connected Arduino after clicking the button. Its eventual responses appear in the large output area below. In itself, this tool behaves as you would expect. In practice, the only obstacle is exclusivity – as long as the serial terminal is open, the Linux operating system considers the serial port belonging to the Arduino to be blocked and therefore does not allow other programs to access it. Be that as it may; we want to enter 3 in the first step and send that towards the Arduino Uno afterwards. It thanks us with a short flashing of the LED and then switches it off again. The reason for this behavior, which sounds paradoxical at first, is that the serial terminal – like various other serial libraries – also transmits one or the other padding bit in addition to the actual user data. In our case, this is a carriage return, which can be read by the method Serial.parseInt() annoyingly and erroneously as an integer with the value 0. To work around this problem, it is a good idea to adapt the code of loop according to the scheme in Listing 3.
Listing 3
void loop() {

while (Serial.available() > 0) {

int inVal = Serial.parseInt();

if (Serial.read() == '\n') {

if(inVal>2)

digitalWrite(13, true);

else

digitalWrite(13, false);

}

}

}
Instead of immediately writing the supplied integers in the direction of the GPIO pin drivers as before, we read further information from the transfer buffer after calling parseInt. Only if there is a return there, then we consider the value stored in inVal as valid and write it via the selection in direction of the hardware. At this point it is critical that you must not forget to save the sketch in the first step and to send it afterwards over the arrow symbol again in the direction of the board. In the next act, we can return to the serial terminal again and send the number 3 – the reward for the effort is that the LED now stays on.
Return to integration
For now, we can consider the software running on the Arduino Uno to be viable at this point, so let’s return to driving it from the PHP environment. Open the worker file again in an editor of your choice and adapt the code according to the following scheme:
<body>

<?php

include 'PhpSerial.php';

$serial = new PhpSerial();
Serial ports offer a lot of different configuration possibilities – besides the baud rate already mentioned above to define the speed, you can also influence the length of the characters to be transmitted and the information to be placed before and after the user data. In the interest of simplicity, here is a configuration that works with most Arduinos. Just think of the snippet in Listing 4 as a piece of code falling from the sky.
Listing 4
$serial->deviceSet("/dev/ttyACM0");

$serial->confBaudRate(9600);

$serial->confParity("none");

$serial->confCharacterLength(8);

$serial->confStopBits(1);

$serial->confFlowControl("none");

$serial->deviceOpen();

echo '<p>Hello World</p>';
?>
</body>
In theory, this version of the program is ready to fight. Save the file and activate it again from a browser of your choice to enjoy the appearance of a blank web page. PHP experienced developers know that this indicates the occurrence of a serious error in the backend. To analyze the problem, we want to evaluate the logging information created by the server, which is ideally done with cat on Linux:
tamhan@TAMHAN18:/var/log/apache2$ cat error.log
Besides various status messages, we also find the error “PHP Warning: include(): Failed opening ‘PhpSerial.php’ for inclusion (include_path=’.:/usr/share/php’) in /var/www/html/worker.php on line 7”. This informs us that the author’s placement of the library downloaded from GitHub was incorrect. Fortunately, this problem can be solved in the terminal with a single command:
tamhan@TAMHAN18:/var/www$ sudo mv PhpSerial.php html/PhpSerial.php
At this point, we return to the browser and press F5. Unfortunately, the reward for our efforts is once again a white window. In the log file, however, we now find the string “No stty availible, unable to run. in /var/www/html/PhpSerial.php on line 55” instead of the previously known warning regarding the include file – the spelling error in the word “availible” alone informs us that this error originates from the body of the PHP serial library. As is so often the case in the world of the Internet of Things, there is no substitute for understanding the operating systems and the components involved. PHP-Serial handles communication with the hardware via the command line tool stty, whose presence can be verified by calling it in the terminal:
tamhan@TAMHAN18:/var/log/apache2$ stty

speed 38400 baud; line = 0;

-brkint -imaxbel iutf8
Since the binary is (usually) already present, we are dealing with a mismatch. If you Google for the error message, you will notice a lot of references, mostly pointing to incompatibilities between the return value of the installed version of stty and the code located in PHP-Serial. To solve the problem we open the file PHPSerial.php and search for the following string in the first step:
if ($this->_exec("stty") === 0) {

register_shutdown_function(array($this, "deviceClose"));

} else { ...
If you want to go completely freehand on the search, you can alternatively use the misspelled error message. Under Ubuntu 18.04, the following adjustment of the library code causes the error to disappear:
if ($this->_exec("stty --version") === 0) {

register_shutdown_function(array($this, "deviceClose"));

} else { ...
Instead of checking the return of a parameterless call as before, we now instruct the tool to return its version state. A pleasant side effect of this is that such a call (at least under Ubuntu 18.04) generates the return value expected by the library again in case of success. By the way, working through this common debugging operation is not pedantry on the part of the author and publisher – the PHP serial library, due to its hardware proximity, is one of those products that need to verify it most carefully before using it on any target system. In the first step, we can now command the light-emitting diode to be turned off:
$serial->deviceOpen();

sleep(2);

$serial->sendMessage(2 . "\n");

sleep(1);

?>
For power-on, the code behaves in a broadly analogous manner:
sleep(2);

$serial->sendMessage(3 . "\n");

sleep(1);

?>
There are two interesting things about this snippet. First, we pause for a bit of reflection after calling the function because initializing the serial API on the Arduino takes some time. Second, in addition to the actual payload, we also need to send a carriage return to satisfy the condition implanted earlier. The next task is testing the program. Both variants work insofar as the light-emitting diode connected to pin 13 takes the desired state at the end. The difference lies in the fact that wild flashing occurs during processing.
Narrowing the chaos
We noted above that virtually all serial APIs route less useful information towards the connected target device in addition to useful data. While this may not be critical for our small application, each of you should also be able to imagine situations where such misconnections lead to massive problems. Furthermore, serial connections – think less of a measuring device lying at the lab bench, and more of industrial electronics – are susceptible to stray signals from outside. To circumvent such problems, the introduction of more robust protocols that check the supplied information for validity of structure and plausibility of data is a good idea. As a first task, we return to the Arduino sketch, where we adapt the method used to process incoming information to check the first character delivered:
void loop() {

while (Serial.available() > 0) {

char checkChar= Serial.read();

if(checkChar!='T') continue;
The processing of the other payload only takes place under the condition that the returned char value contains a capital T. It follows logically that we must next switch to the PHP file, where we now also deliver the required constant with SendMessage. Thanks to the concatenation syntax with the dot, no major change to the code is required for this:
$serial->sendMessage("T" . 3 . "\n");

sleep(1);

?>
At this point, we can run our program again to make sure that it is working correctly – changes to the state of the light-emitting diode can still be targeted, but the chaotic flashing that occurs during startup is still part of the game. To analyze the problem, the next step is to comment out the code responsible for adjusting the light-emitting diode state in Loop:
if(inVal>2)

digitalWrite(13, true);

else

digitalWrite(13, false);
If you run the program again in this state, you will notice that the LEDs still flash chaotically. This behavior, which is inexplicable at first glance, is due to the architecture of the process computer and the bootloader responsible for communication with the PC – which is, by the way, a problem that you as a developer of process computer-based solutions have to deal with again and again (regardless of the manufacturer). To work around this, it would be a good idea to use a different pin, for example.
Sending data in the direction of the PC
So far, our PHP script has been able to send commands to the Arduino, but not receive any from it. Our next task is to use the Serial.write method in the Loop method to send information that the Arduino should send to the workstation via its serial port (Listing 5).
Listing 5
if(inVal>2) {

digitalWrite(13, true);

Serial.write("Setze auf True");

}

else {

digitalWrite(13, false);

Serial.write("Setze auf False");

}
For receiving, let’s initially settle for the var_dump method on the PC side, which passes the variable contents as well as meta information into the PHP server’s output stream:
$serial->sendMessage("T" . 3 . "\n");

sleep(1);

var_dump($serial->readPort());

?>
After saving and updating both components, we see the output string(14) “Set to True” in the browser window, which informs us that the information supplied by our Arduino arrived on the workstation side in the form of a string. The next test is to read the value at one of the ADCs according to Listing 6.
Listing 6
if (Serial.read() == '\n') {

if(inVal>2)

{

digitalWrite(13, true);

int  val = analogRead(A3);

char valStor = val/4;

Serial.write(val);
}
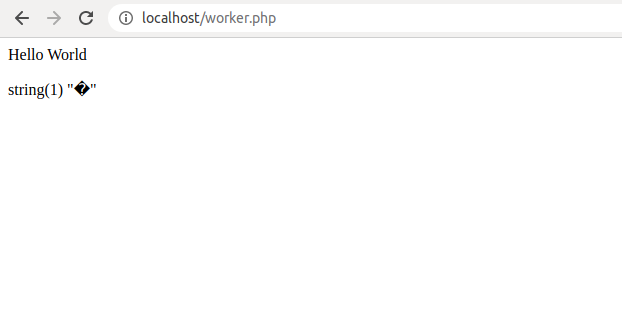
The only interesting thing here is the division by the constant factor 4 – it is due to the fact that the ADC works with 10-bit resolution by default, but in the interest of convenience we only want to send eight-bit values to the computer via the char overload of Serial.write. This approach, while promising in theory, does not really work in practice, because the results – as shown in Figure 5 – appear again in the form of a string at the computer.
Benchmark, compact
Finally, we want to determine how fast our solution working on PHPSerial and an Arduino Uno outputs waveforms in practice. For this, we remove the calls for data transfer from Loop in the first step and then ensure that PHP commands a group of state changes according to the following scheme as part of the startup:
for ($x = 0; $x <= 100; $x++) { $serial->sendMessage("T" . 3 . "\n");

$serial->sendMessage("T" . 1 . "\n");

$serial->sendMessage("T" . 3 . "\n");

$serial->sendMessage("T" . 1 . "\n");

}
We then connect the output to a Picoscope PC oscilloscope and see the result shown in Figure 6. Pay particular attention to the measurement line shown at the bottom, which summarizes the frequency of the waveform seen over a group of acquisition runs.
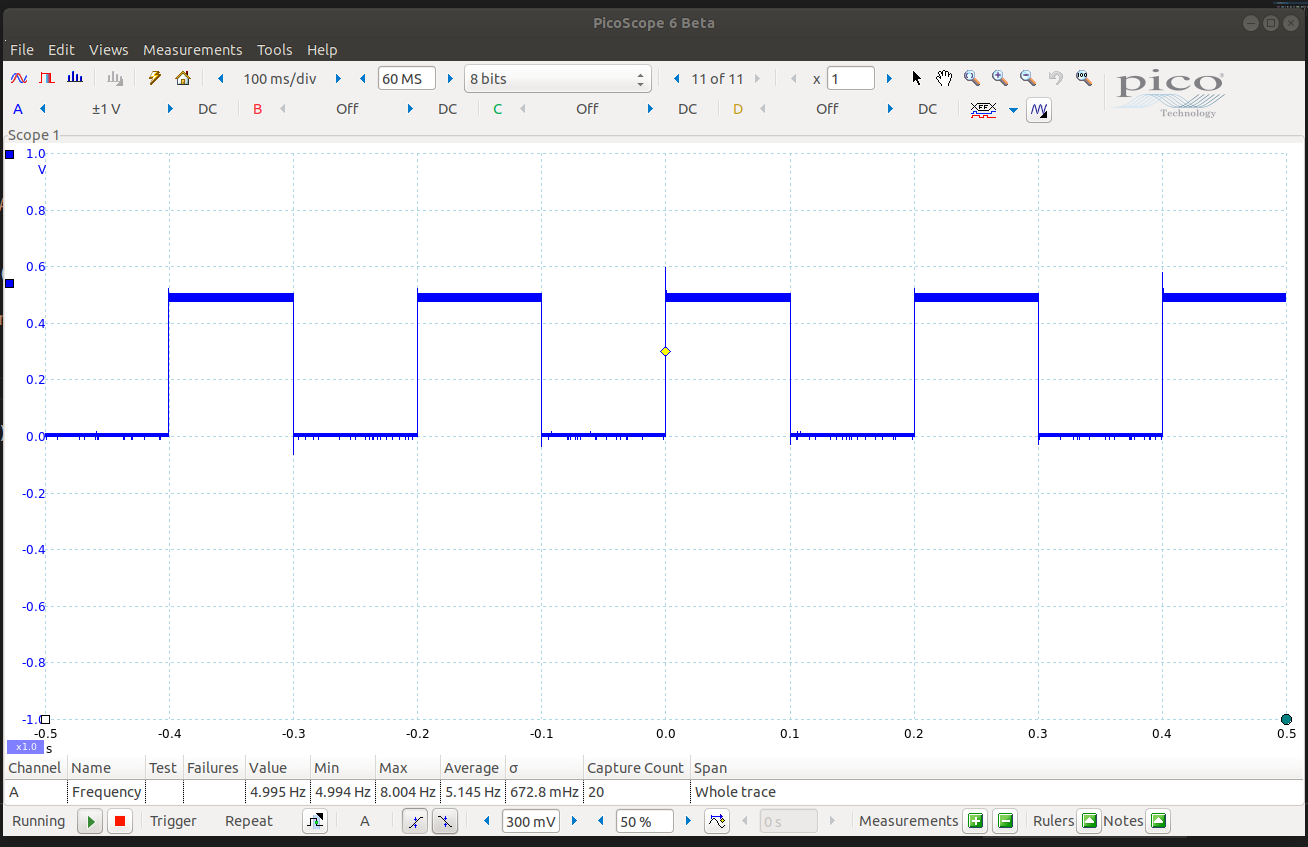
The working frequency of around five hearts is so slow that it can even be observed with the naked eye – since a directly working Arduino achieves much faster outputs, it is obvious that our structure brings along some overhead. A nice way to smoke out this very overhead is to request a higher baud rate on both the PC and Arduino sides, which in theory should result in faster communication. The author experimented with this, but on the Picoscope there was no change in the measured frequency. The reason for this unsatisfactory behavior might be that the communication API is not very efficient – time is lost brokering between PHP, Linux, and the hardware. To work around this problem, the waveform generation could be done on the Arduino and triggered from the PC; a task that the author recommends as a little homework.
What’s next?
The direct exchange of binary information between process computer and workstation may accomplish MSR tasks – it would be more convenient if we can outsource the development of the protocol to another vendor. The Firmata protocol has established itself as a quasi-standard in this area and will guide us through our experiments in the world of PHP hardware control in a follow-up issue. Before that, though, we want to talk about a brand new product that has the potential to permanently change the world of PHP hardware control. Be excited!