

Missed the previous sections? Part 1 and Part 2 can be found here.
PlatformIO is a very powerful development tool that greatly automates many setup steps from selecting and installing the necessary toolchain parts such as crosscompilers, linkers, flash tools, etc., making it much easier for developers to adapt firmware code to different target hardware. Besides its ability to integrate different embedded development platforms, PlatformIO is also characterized by its ability to trace and support the various tasks along the value chain of software development. These cross-cutting topics include automated procedures for unit testing and also the automatic construction and deployment of software: all components of continuous integration (CI for short).
Tasks for Continuous Integration
In the area of software development for web and desktop applications, CI is a fixed tool repertoire. Components from previous steps are continuously combined with the current steps in build steps, integrated, tested and, if necessary, packaged to form the artifacts for the subsequent steps. One goal is to increase the quality of the results through the automation process: When all steps are automated according to the same quality-assured scheme, confidence in the ability to deliver increases. Code comes from code and artifact repositories, is automatically compiled and linked, tested, and optionally subjected to metrics and static and dynamic code analysis. CI servers are usually directly connected to the repositories, so that each code push triggers a CI run. Thus, for each individual code change, it can be shown whether it improves or degrades the quality.
With Continuous Deployment, the automation step is also extended to the production systems, i.e. the newly built application can be automatically deployed on a server.
CI for Embedded
In the area of embedded development, there are now a number of challenges to be mastered in terms of CI, as the framework conditions can vary greatly in some cases. The integration into code repositories can be regarded as identical, compiling the firmware code requires suitable compilers in the case of C/C++, but these are also available and can be installed automatically. Only the availability of special compilers can be restricted to certain platforms, which is interesting for the selection of CI worker nodes.
The first differences arise during testing: The parts that are independent of the hardware and the embedded operating system can also be tested on an Intel/Arm-based server or notebook. Code that uses embedded OS libraries or the hardware abstraction layer usually has to run on the embedded device or equivalent developer board – not necessarily difficult to implement, but difficult to consider. Managing the artifacts is almost identical: Compiled/linked firmware parts are binary files. Deployment, on the other hand, is fundamentally different: In the last part we flashed the NodeMCU board via a USB cable, alternatively – depending on the board and settings – a USB programmer can be used. Prepared embedded devices can also receive their firmware “over-the-air”, e.g. WiFi. In any case, the CI server and the board must communicate (spatially) more closely with each other than, for example, a CI server with an application server in the cloud. PlatformIO also offers a solution for this.
Cloud CI Services
For this part of the article series, two cloud-based CI services show how firmware can be compiled, tested and remotely flashed to an embedded device from the CI service. The basis is PlatformIO with the code example of the last part. It is available for download on GitHub. CircleCI is used as CI services. CircleCI can integrate projects from GitHub and BitBucket. In order to understand the example, an account with the respective provider is useful, the registration with CircleCI can then be done via OAuth.
Testing locally
To refresh and get started with PlatformIO, we will take a quick look at the commands for compiling and flashing the demo code. Listing 1 gives a compact overview.
[java]# Checkout demo code
$ git clone https://github.com/thingforward/entwicklermagazin2018-pio-repo.git
# compile & link
$ pio run
# “Upload” == Flash
$ pio run –t upload
# Check serial output of device
$ pio device monitor [/java]
A relevant function for CI is “Remote Flashing”. This function is part of PIOPlus and allows remote control of the PIO instance on a remote PC via an access token. For Continuous Integration, this means that the CI service in the cloud can be authorized to flash a firmware onto a device connected via USB to a completely different server/notebook – a very interesting feature. “PIO Remote” requires registration with PlatformIO (see Listing 2), but can be tried out in the community version with one agent and a limited number of updates per month.
[java]# Register at PIOPlus
$ pio account register
PlatformIO Plus (https://pioplus.com) v1.1.6
E-Mail: ……
Successfully registered!
Please check your E-Mail for the further instructions
$ pio account login
PlatformIO Plus (https://pioplus.com) v1.1.6
E-Mail: …
# Start Remote Agents of Name “remote-1”
$ pio remote agent start –name “remote-1”
PlatformIO Plus (https://pioplus.com) v1.1.6
2018-04-12 14:11:47 [info] Name: remote-1
2018-04-12 14:11:47 [info] Connecting to PIO Remote Cloud
2018-04-12 14:11:47 [info] Successfully connected
2018-04-12 14:11:47 [info] Authenticating
2018-04-12 14:11:47 [info] Successfully authorized
# Create a token
$ pio account token
PlatformIO Plus (https://pioplus.com) v1.1.6
Password:
Personal Authentication Token: 2adf3778a01e4bff6688677908ea9705d5f9ab91 [/java]
The last two commands from Listing 2 represent the connection of the remote ends: “Pio remote agent start” starts the Remote Agent and registers it as an endpoint in the PlatformIO Cloud under the name “remote-1”. “pio account token” creates an access token.
To flash firmware remotely, the “run” command is preceded by the “remote” command, and the compiled firmware is sent over the network to the agent. The token is prefixed as an environment variable:
$ PLATFORMIO_AUTH_TOKEN=2ad…91 pio remote -a remote-1 run -t upload
On the agent’s side you can see the reception and execution of the command:
2018-04-12 14:21:13 [info] Remote command received: psync
2018-04-12 14:21:18 [info] Remote command received: run
Integrate in CircleCI
To build the firmware with CircleCi and flash it remotely, login to CircleCI in OAuth connection to the repository, e.g. GitHub. To play through the demo project it is recommended to fork the repository under into your own GitHub account. On the dashboard, a click on “Add Projects” in the left button bar brings the active repositories to the screen, another click on “Set Up Project” for the correct project triggers the setup (Screenshots 1 and 2).

Figure 1: Add a new project
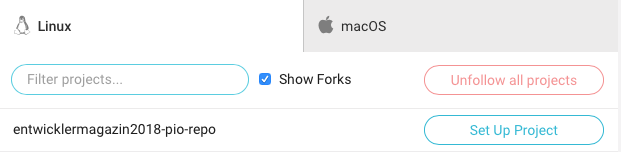
Figure 2: Choose a repository
In the following step, the operating system and language environment can be selected (Figure 3). In our case PlatformIO runs as a Python project under Linux.

Figure 3: Project settings
At this point CircleCI needs to know how to build, test and flash. This can be controlled from the code repository with a configuration file. CircleCI supports two variants, 1.0 and 2.0, the former being the older version documented in PlatformIO. For this purpose, a YAML file “circle.yml” and created it with the commands for building the build environment, building the project and remote flashing, see Listing 3.
[java]dependencies:
pre:
# Install the latest stable PlatformIO
– sudo pip install -U platformio
# preinstall esp8266 platform
– platformio platform install espressif8266
compile:
override:
– pio run -e nodemcuv2
deployment:
override:
– pio remote -a remote-1 run -t upload [/java]
In the “Pre” part (lines 1-6) are the shell commands necessary for installing PlatformIO: PIO itself is installed via pip, the Python Packager Index Manager. As an example of further pre-steps, we add the espressif8266 platform to get the compiler toolchain.
In the “Pre” part (lines 1-6) are the shell commands necessary for installing PlatformIO: PIO itself is installed via pip, the Python Packager Index Manager. As an example of further pre-steps, we add the espressif8266 platform to get the compiler toolchain.
The “compile” part in lines 7-9 compiles and links, the “deployment” part at the end uses the “pio remote flash” command to flash the board. For this, the PIO-Remote Agent must be started at the other end and the development board must be connected via USB (in our case a NodeMCU).
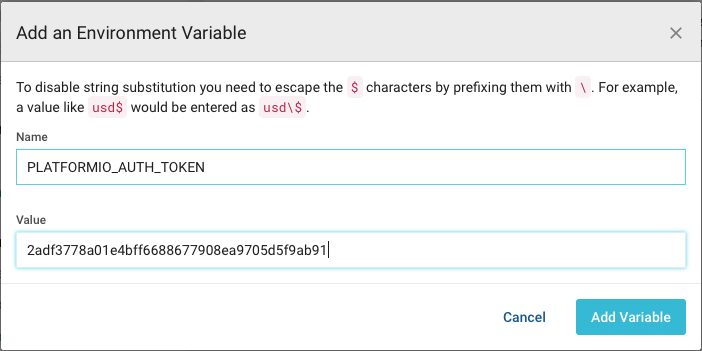
Figure 4: PIO Access Token as an Environment Variable, to be used in build steps
A setting must still be selected after the project has been created, CircleCI must receive the PLATFORMIO_AUTH_TOKEN. This can be done in the project settings under “Settings”, “Organization/Projects”, then by clicking on the cogwheel of the project. The Access Token can be added under ” Environment Variables”, “Add Variable” (see Figure 4).
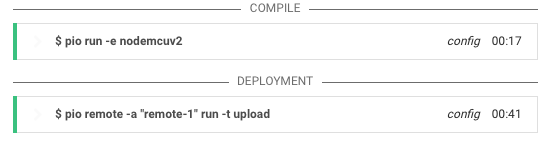
Figure 5: CircleCI: Dashboard shows build steps
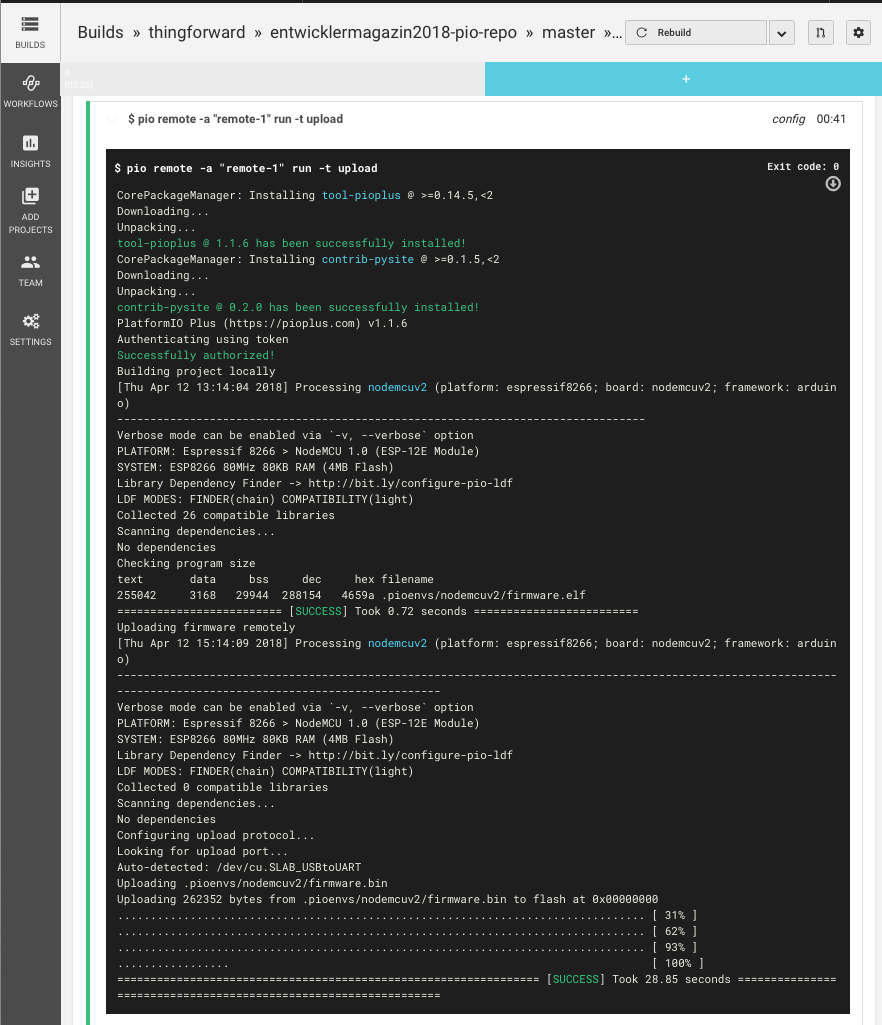
Figure 6: CircleCI: Remote Flashing of firmware
Conclusion
Continuous integration for embedded, in the cloud: possible. CircleCI is just one example, PlatformIO supports further CI services in the cloud, or in a local installation like Jenkins. Attentive readers and observers of the CircleCI dashboard will have noticed that we have embezzled an important step: testing. In the next part of the series we show how unit tests for embedded devices can be set up easily.


